Drupal
PNW Drupal Summit Session: Calendaring with Drupal
Things You Can ( or Can't ) Do With the Full Calendar Module
Creating a gallery of your YouTube videos that you can filter by various tags is a trivial task in Drupal 6.

Creating a gallery of your YouTube videos that you can filter by various tags is a trivial task in Drupal 6. Here's an overview of the steps you need to take to add a video gallery to your Drupal 6 site:
Check out a demo of this sweet gallery on the infocus website!
Let's get to the nitty gritty of setting up this gallery.
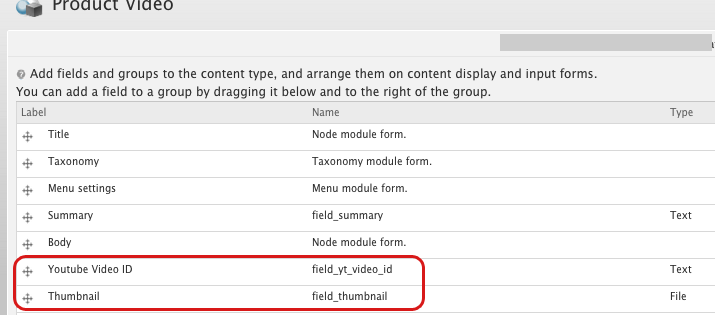
You'll want to go ahead and create a new content type, in this example we're going to name it video. Then we'll need to add some fields. I've added a text field for our youtube video ID and a taxonomy reference for our tags. Note that the wonderful File Entity and Media modules will allow you to have fieldable files easily – but they still need a lot of work to be more content-manager friendly, and are Drupal 7 only.
The next thing you'll need to do is set up a new view to display your gallery. In reality, your view will just show the grid of videos at the bottom of the gallery. We'll use templating and JavaScript to handle displaying the player and transitioning from one video to the other. These are the settings I used in this example:
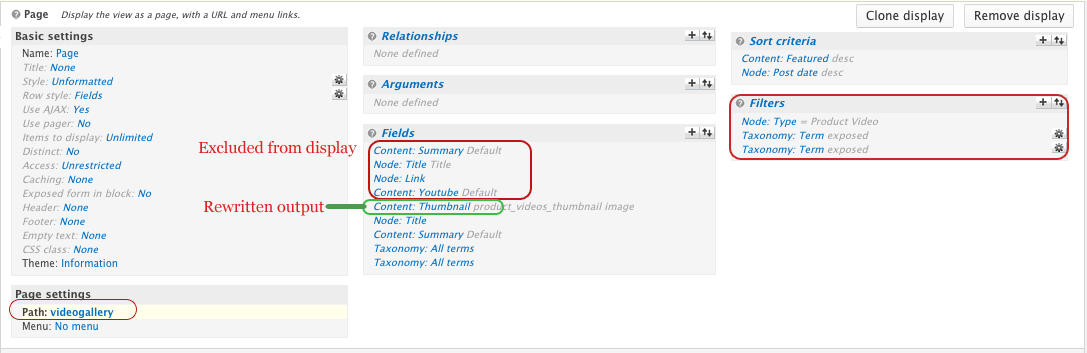

I've got the YouTube ID Excluded from display, as well as the first link, title and summary. They are going to show when the video is clicked on.
Take note that I've given this view a page display and the filters I've placed on it.
Have you got that all set up? Cool, let's move on to making it functional!
Now we'll need to add in the player HTML and template the results from our view. I used a custom content pane in Panels to add in the player HTML, but you could also use a block that is only visible on the view page.
Here's the player HTML you need to add to a block or a pane on the view page (Or even in the header for the view):
Here's the template that runs on the view – I kept some js in here to only run when this view is used (since we could use it elsewhere).
// views-view-unformatted--my-gallery.tpl.php
/**
* Extended from
* @file views-view-unformatted.tpl.php
* Default simple view template to display a list of rows.
*
* @ingroup views_templates
*/
drupal_add_js('
$(function() {
var params = { allowScriptAccess: "always" };
var atts = { id: "myytplayer" };
var ytplayer;
var firstID = $(".grid-video:first").attr("data-ytid");
swfobject.embedSWF("http://www.youtube.com/v/"+firstID+"?enablejsapi=1&playerapiid=ytplayer&version=3&modestbranding=1",
"ytapiplayer", "780", "439", "8", null, null, params, atts);
$(".grid-video:first").addClass("nowplaying");
$("#player-body").html($(".grid-video:first").children(".videoInformation").html() );
});
function onYouTubePlayerReady(playerId) {
ytplayer = document.getElementById("myytplayer");
}
', 'inline');
?>
$row): ?>
This module will simply add a bit of JavaScript to your site that will enable the YouTube player. Here's what you'll need with some explainations as to how they function:
mygallery.info
name = My Video Gallery
description = Adds a video gallery
core = 6.x
package = Gallery tweaks
files[]=product_video.js
files[]=swfobject.js
mygallery.module
/**
* Implements hook_init
*/
function mygallery_init() {
drupal_add_js(drupal_get_path('module', 'mygallery') . '/swfobject.js');
drupal_add_js(drupal_get_path('module', 'mygallery') . '/mygallery.js');
}
Here you can see I'm just adding the javascript to our included files. Since this is a short tutorial, I've stuck swfobject.js in the module. Normally you would want to include this by using the Libraries module.
mygallery.js
Drupal.behaviors.mygallery = function (context) {
// Load video on click, apply css (for png overlay)
$(".grid-video:not(.pv-processed)",context).each(function() {
$(this).addClass("pv-processed");
$(this).click(function() {
//if this is nowplaying, return. -- Prevents reloading a video.
if ( $(this).hasClass("nowplaying") ) {
return;
}
$(".nowplaying").removeClass("nowplaying");
var vidID = $(this).attr("data-ytid");
thismyytplayer = document.getElementById("myytplayer");
thismyytplayer.loadVideoById(vidID);
$("#player-body").html($(this).children(".videoInformation").html() );
$(this).addClass("nowplaying");
});
});
// on exposed filter change, submit the form
$(".page-videos select[name='type']:not(.pv-processed)").each(function() {
$(this).addClass("pv-processed");
$(this).change( function() {
$("#views-exposed-form-product-video-gallery-default").submit();
});
});
}
The JavaScript here handles what happens when a user changes the exposed filter options, or clicks on the thumbnails to play a new video.
Once you've written the module and enabled it in your site, your gallery should be functioning!
Happy coding!
Things You Can ( or Can't ) Do With the Full Calendar Module
We're just past the second anniversary of 8.0.0. To see how D8 is doing compared to prior releases, we put together the chart above, based on...
With the recent release of versions 7.2 and 6.22, a significant Drupal security flaw in 6.x has been identified and fixed. While I feel strongly this...