The Big Picture The aim of this blog post isn’t to get into the nitty gritty how to build and run a containerized app on your favorite cloud provider with a specific clustering technology.

The Big Picture
The aim of this blog post isn’t to get into the nitty gritty how to build and run a containerized app on your favorite cloud provider with a specific clustering technology. Rather, the aim is to discuss containers - where they came from, how they differ from VMs, scalability considerations, container repositories, running containers locally, what a container image consists of, and finally clustering and orchestration tools available to manage and maintain your container workloads. If you are wondering whether containers are right for you, and what considerations you may need to think about before embarking on a journey to containerize all the things, this blog post is for you.
A Brief History of Containers
Few technologies have consumed the interest of the tech community and conferences in the DevOps space lately like containers. Containerization as a concept has been around for many years if you count jailing, again in 2008 with the more complete LXC Linux container management system, and most recently with Docker. Docker the company was founded in 2010 as dotCloud and was renamed to Docker in 2013, and it is at this point that the container revolution really started to build momentum. Docker partnered with RedHat in 2013 and with AWS in 2014 to create the Elastic Container Service (ECS).What Are Containers and Why Are They Useful
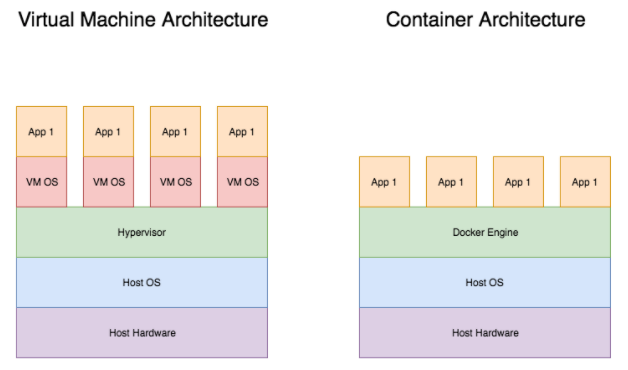
To understand why contains are useful, looking at the concepts of the paradigm shift of bare metal servers to virtual machines will help put things in context. In the traditional datacenter, model servers were a bare metal piece of hardware with an operating system and a designated function, but they had many drawbacks. Servers had to be purchased with max loads in mind to handle spikes in capacity - and often sat idle - consumed large amounts of power, were difficult and expensive to backup and maintain disaster recovery. Server virtualization revolutionized the world when one could purchase a large powerful server. Instead of sitting idle, the hardware could be partitioned up into software representations of RAM, CPU, Disk, Network I/O, etc. The underlying operating system responsible for this was the Hypervisor; common household names in this space are VMware, Hyper-V, Citrix XenServer, and KVM. While the gains associated with virtual machines giving economies of scale (ie: multiple virtual servers per physical server), easing the process of backups and disaster recovery, as well as giving rise to public cloud providers like AWS and Azure, there was still the underlying inefficiencies of having multiple copies of the same OS running consuming unnecessary disk and compute capacity. Enter containers.
Containers share the kernel of the underlying container host, however they don’t need to run a full operating system. Rather, the software and dependencies are wrapped in a container that run on top of the container host. This allows a single container host (be it bare metal, virtual machine, or cloud offering) to host a substantially larger amount of services than the traditional server virtualization model. From the cost perspective, this allows further benefits that achieve greater economies of scale than what was previously possible. From the development and operations perspective, the improvements are even more vast. Among the chief benefits of containers is the ability to develop in local environments on containers, and ship the container confidently from local dev through lower environments into production with exactly the same set of dependencies all safely wrapped in a container. Given the nature of containers and the multilayered filesystem of Docker, it’s easy to rapidly deploy new images, pull down the most recent image, and commit new images to the container repo. This makes changing libraries without tainting a local or production environment substantially easier, as well as providing rapid rollbacks in the event of a deployment failing or critical bug discovered upon deployment.
Scalability Considerations
Much in the same respect that applications can be scaled by adding more virtual machines to a load balancer, containers can also scale this way. When approaching containerization of an application, it’s best practice to segment out the application as much as possible so that each component can be scaled and deployed independently for the consummate application or service they are a part of. What this might look like will vary depending on your application. This may be an Nginx container coupled with one or more PHP-FPM containers, a Solr container, and a MariaDB container. In this respect if a single part of the application needs to be scaled it can be scaled independently of the rest. So far the picture painted of containers seems pretty rosey, however there are some serious gotchas to be aware of when dealing with containers.
Containers are fantastic for handling stateless workloads. If you have a microservice or an application that performs a specific function and doesn’t need to retain data locally it’s a perfect candidate for containerization. It wasn’t more than a few years ago that use of containers in production environments was cautioned against for this very reason, but at the time of writing,containers are production ready and have been for at least the past year, provided that stateful applications are carefully planned. For these stateful applications there are several options in a containerized environment, including mapping volumes from host through to the container, thus ensuring that the data stored in the volume persists if the container dies or is replaced with a new container, if the containers are running on a cluster of hosts this can also be accomplished by mapping network attached storage directly to the containers or to the container host and passing the volume. Depending on the use of clustering technologies, there are also options at the cluster level for providing persistent volumes for use by specific sets of containers. If your application is running in a cloud environment such as AWS or Azure you may also leverage things such as Application Load Balancers, RDS (or Azure SQL), as well as other services you wish to offload (CDN, DB Caching, Search, shared storage, etc).
While the container itself becomes the atomic unit of scaling it is also important to ensure close monitoring of your container hosts to provide adequate provisioning as well. Some clustering services we will discuss later (such as KOPS and ECS) have mechanisms for setting up alerting metrics that can trigger actions to scale both container workloads and the underlying hosts running the container workloads.
Container Repositories
Much like we have repositories to check in and out our code bases, containers also have repositories where they are stored and revisions to containers are checked in. The most common container registry is the freely available Docker Hub. From the Docker Hub you can find official containers for Debian, Ubuntu, CentOS, Nginx, MariaDB, Gunicorn, etc. These can be used as the initial building block for your customized container images. Once you customize your images though, you will need to store them somewhere. Docker Hub offers 1 free private container repo to members, and several paid options for multiple private container repos. This is akin to GitHub’s paid service to host private git repos.
Another option is the Amazon Elastic Container Repository, or ECR. ECR allows you to store your container images in a private repository within AWS. Much like their other services, there are no costs for ingress bandwidth, but there are charges for egress bandwidth outside of AWS. If your container workload is hosted within AWS, then ECR may be an excellent choice - the latency is low and speed is high, allowing larger container images to more rapidly be downloaded and deployed to your container hosts, as well as the ease of integrating your images with services such as ECS.
Similarly, Azure provides a container repository offering that utilizes the same Docker CLI options, and is built for easy use with open source tools. There are a plethora of different docker repositories available, both public and private each with different costs, features, and limitations.
Running Containers Locally
One of the key benefits to containerization applications is to develop on the same platform as production, which in this case is a container that has all dependencies wrapped in itself that can be shipped through various stages of deployment and various host operating systems with consistent results. Running containers locally allows for developers to work off the same consistent image both reducing the likelihood of incompatibilities from mismatched prod and dev environments. It also allows for developers to quickly onboard and offboard on projects with their local environments, and affords opportunities to test new libraries or upgrades of libraries without polluting the local development environment. Additionally, QA engineers have an easier time spinning up a container and all of its dependencies locally, allowing for more rapid QA work.
To run containers locally, the easiest option is to install Docker on your local machine. Docker makes this install process relatively simple for multiple platforms. You can visit this following link to download the latest version of docker for your platform. Locally on a Windows machine, Docker will run in Hyper-V with a special VM created during the Docker install process. You can additionally choose to install the Docker toolkit and instead choose to use VirtualBox instead.
The process of installing Docker for Mac is also simple - just go to the same link above to download Docker for Mac. In the past, Docker utilized VirtualBox to run a VM to provide the Linux kernel to containers. This option is still available if you install the Docker toolkit and have specific needs around this. Otherwise the newer version of Docker run on Hyperkit, a native virtualization environment.
In any case once Docker is installed locally you will be able to use the Docker CLI to pull images, as well as create and run Docker containers. If your production environment runs Kubernetes (discussed later in this piece), you may also choose to install minikube on your local environment to simulate the behaviour of a production Kubernetes environment. Even if this is the case, you will need a container engine installed locally to satisfy the needs of minikube, whether that’s Docker or Rkt.Anatomy of a Container
I would be remiss to have a discussion about containers from the big picture level without talking about the anatomy of a container. Essentially in an ideal world, a container would be as tiny as possible only including the binaries and code needed to run the microservice or application in the container.
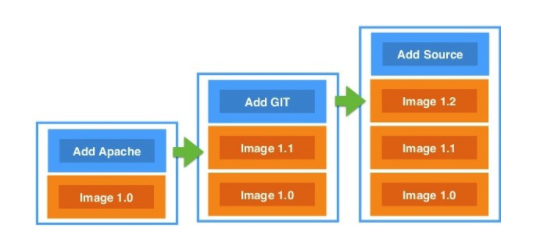
Essentially the container itself is a small Linux operating system with a standard file system layout (/etc, /opt, /var, /usr, /home, etc). One of the most interesting points of containers themselves is the unique layered file system AuFS. The design of AuFS is such that the base image of a container exists as a layer of the filesystem. Each subsequent container used in a build creates a new layer of the filesystem. Each layer from bottom up is read-only, except the top layer to reduce duplication of data. If a change is needed on a file that exists in a lower level filesystem of the container, it is copied up to the top layer and modified there. This essentially creates a system of diffs for the filesystem.
Beyond the file system unique to Docker, the only other real point of interest is the process by which containers are built. To build a container there are really 2 possible approaches. The first is to spin up a container, customize it, and run commands to tag it as a new container image. This is a very easy approach, but it is not best practice to use this method. The other way to build container images is to create a Docker file with a series of directives that will be run. Once the container is built it can be tagged for use and committed to the container repo. This method is the preferred best practice methodology.
Below is an example dockerfile from a local development environment for a drupal site using the laptop’s own mysql instance to connect to:
#Dockerfile to create local dev environment based off mtm/centos/6/lamp:latest
#Specifies the image the container is based off of
FROM <your docker image location here>
MAINTAINER <maintainer email address>
#Creates Docroot and local settings
RUN mkdir -p /var/www/sites/virtual/$SITENAME.dev/current && mkdir -p /var/www/sites/virtual/$SITENAME.dev/shared/default && cp /root/local_settings.php var/www/sites/virtual/$SITENAME.dev/shared/default/local_settings.php && chmod 666 /var/www/sites/virtual/$SITENAME.dev/shared/default/local_settings.php && chown -R deploy:apache /var/www/sites/virtual/$SITENAME.dev/
#Setup Services to start cleanly
RUN echo "/sbin/service httpd start" >> /root/.bashrc
RUN echo "/sbin/service mysqld start" >> /root/.bashrc
RUN echo "/sbin/service php56-php-fpm start" >> /root/.bashrc
RUN echo "/sbin/service memcached start" >> /root/.bashrc
#Add Slug and unpack tarball
ADD ./tmp/docker_slug.tar.gz /var/www/sites/virtual/$SITENAME.dev/current/
#Create Database
ADD ./scripts/dbcreate.sh /root/dbcreate.sh
RUN echo "bash /root/dbcreate.sh" >> /root/.bashrc
#Expose Ports for HTTP, HTTPS, MySQL, and SSH
EXPOSE 80 443 3306 22
Container Clustering and Orchestration Tools
There are a multitude of clustering and orchestration options available for Docker. The two broadly applicable ones are Docker Swarm and Kubernetes. There are also a handful of cloud native and cloud provider specific options such as Amazon’s Elastic Container Service (ECS), Amazon’s new managed Kubernetes service that was announced at re:Invent 2016 (EKS), Azure’s Container Service (AKS), Google Cloud’s Kubernetes service, as well as non-clustering and non-orchestrated Docker such as Amazon’s Fargate service.
In addition to the cloud native options you can also opt to build your own Docker Swarm or Kubernetes cluster in EC2, Azure VMs, or on premise. For AWS, Kubernetes has an offering called Kubernetes Operations (KOPS) that will create autoscaling groups for underlying hosts, and setup a great deal of underlying EC2 orchestration for your kubernetes cluster. A great deal can be written about all of these technologies, but for the sake of brevity the focus for the remainder of this blog will be Docker Swarm and Kubernetes from an overview level.There are number of courses and tutorials available online for both of these technologies that I would encourage you to look into and test out if containers are on your horizon.
Docker Swarm
Docker Swarm is the native Docker clustering methodology from Docker Inc. Docker Swarm is fundamentally a collection of nodes running the docker engine operation in swarm mode. A Swarm consists of one or more manager and worker nodes. Manager nodes exist to maintain the swarm, and it’s highly recommended to run 3-5 manager nodes to maintain high availability. At any given time there is only one leader among the manager nodes, which is responsible for executing actions against the swarm and other manager nodes simply proxy requests through the leader node. In the event a leader becomes unavailable, one of the other masters will be elected leader. As a general principle it is not recommended to deploy more than 5 masters. To create a docker cluster you can use the following command:
docker swarm init --advertise-addr <specify IP if using more than 1 NIC>:2377 --listen-addr <same address and port>
Once the Swarm is initialized, you can run the following command on the initial node to produce a token you can use to join other master nodes: docker swarm join-token manager. The same thing can be done to join workers using the docker swarm join-token worker command.
The other major component in a Docker Swarm is the worker node. A manager node can also be a worker node. The function of a worker node is to run Docker workloads (containers, services, tasks, etc). To join a worker node to a cluster simply copy and paste the command that was output at the time of creating the cluster for joining worker nodes. If you intend to use auto-scaling this may be something you want to take into rc.local for first run to have nodes auto join the cluster. The join command will look something like this:
docker swarm join --token <token> <ip and port>
Once you have a functional cluster of one or more masters and one or more workers, you can then create services and tasks. Services are declarative and scalable method of running tasks. Tasks are services broken down into containers and metadata and represent the actual work handed out to the worker nodes. Services contain tasks and allow you to scale and schedule your task workloads through a declarative XML file. Below is an example command to create a service:
docker service create --name example1 -p 8080:8080 --replicas 5 example/hello-world
Services can also be scaled on demand from the cli by specifying the service and the quantity by which it should scale. To scale the service illustrated above from 5 replicas to 7, the command would be docker service scale example1=7
To learn more about Docker Swarm visit the official documentation located here
Kubernetes
It’s nearly impossible to go to a conference or an event discussing containers without hearing about Kubernetes. Kubernetes was originally created as a Google project for orchestrating containers written in GoLang and donated to the Cloud Native Computing Foundation (CNCF) as an open source product. The name Kubernetes is derived from the Greek word for Helmsman, and often appears abbreviated as K8S, as there is 8 characters between the K and S in the name. Contrary to popular rumors, Kubernetes is not an open source version of Borg or Omega (internal Google container orchestration platforms), but it does draw on many lessons learned and therefore is positioned as one of the better container orchestration platforms for running container at scale.
Much like Docker Swarm Kubernetes operates on a master and node model, however unlike Swarm masters do not run container workloads, they are responsible purely for management of the cluster. A Kubernetes master contains the following functions:
- Kube-APIServer: front-end to the control plane
- Exposes a REST API
- Consumes JSON via manifest files
- Cluster Store: persistent storage for cluster state and configs using etcd
- Kube-Controller-Manager: controller of controllers
- Node controller
- Endpoint controller
- Namespace controller
- Watches for changes to ensure current state and desired state match
- Kube-Scheduler: watches the APIServer for new pods
- Assigns work to nodes
- Maintains Affinity and Anti-Affinity rules
Additionally master nodes use the kubectl command line as well as maintaining the API on port 443 which can additionally support authentication.
Nodes are as implied by name worker nodes that run container workloads. Nodes in a Kubernetes cluster contain the following components:
- Kubelet: main kubernetes agent on the node
- Registers the node with the cluster
- Watches the APIServer
- Instantiates pods
- Reports back to master
- If items fail it will report the state back to the master so the master can decide what actions to take.
- Exposes an endpoint on port 10255
- /spec endpoint gives info about the node it running on
- Container Engine:
- Pulls images
- starts/stops containers
- Pluggable:
- Usually Docker but also supports rkt
- Kube Proxy: Kubernetes Networking
- Pod IP addressing
- All containers in a given pod share the same internal IP.
- Load balances across all pods in a service.
With that general architecture out of the way, we can start to talk about some of these things like pods, services, and deployments. While Kubernetes sounds massive and cumbersome most of this is all work taking place under the hood. In essence, the approach to Kubernetes is to feed the API server a desired state configuration of your environment and let Kube worry about the rest. It is also worth mentioning at this point that there is a local environment version of Kubernetes called minikube that packs all of the full scale Kubernetes cluster into a localized instance. If your local environment is running on Mac and you have HomeBrew installed, the setup is quite simply running this command: brew cask install minikube. If you’re running another platform such as Linux or Windows the install information for minikube can be found in the README.md file located here.
Starting from the smallest foundational point, we have the pod. Pods are the atomic unit of scale in a K8S environment an consist of one or more container. When a pod is instantiated the pod will come online all at once when all containers in the pod successfully start. If a container in a pod of multiple containers fails to start, the entire pod will fail to start. Pods share a loopback localhost ip and hostname, as well as an internal IP to the cluster and an internal DNS name. When configuring a pod you can specify what container images should be used, what ports to expose, and what zone they should be deployed into. To create a pod you can run the command kubectl create -f pod.yml. Below is an example pod.yml file:
apiVersion: v1
kind: Pod
metadata:
  name: example-pod
  labels:
	zone: prod
	version: v1
spec:
  containers:
  - name: hello-world
	image: hello-world:latest
	ports:
    - containerPort: 80
Pods can also be deployed via replication controllers, which essentially act as a wrapper around a pod. Rather than deploying a pod on its own, you can instead deploy it wrapped in a replication controller. It will continually run a reconciliation loop to watch actual state and ensure it matches desired state. To create a replication controller you can run kubectl create -f rc.yml. Below is a sample rc.yml file:
apiVersion: v1
kind: ReplicationController
metadata:
  name: example-rc
spec:
  replicas: 10
  selector:
	app: hello-world
  template:
	metadata:
  	labels:
    	app: hello-world
	spec:
  	containers:
  	- name: hello-ctr
    	image: hello-world:latest
    	ports:
    	- containerPort: 8080
To add more or less replicas, simply update the replicas number in the file and run kubectl apply -f rc.yml. At this point we’ve discussed pods and replication controllers. What happens if your pod dies and the replication controller goes out and spins up a replacement? Your new pod will have a different IP and internal hostname. That’s not very helpful if we’re attempting to load balance services on it. This is where services come into play. Essentially the function of a service is to provide a consistent IP and hostname within the K8S cluster with which to put in front of your pods much like you would with a load balancer. This way if additional pods get spun up or pods die, get replaced, etc your application will always maintain a consistent IP and hostname it can be reached at. There are a few different service types that can be used, they are as follows:
Services can be created within Kubernetes iteratively by running expose commands such as kubectl expose rc <rc name> --name <name-svc> --target-port= <port> --type=NodePort, or they can be created declaratively by using a yml file much like the pods and replication controllers. To create a service from a yml file you can use kubectl create -f svc.yml:
apiVersion: v1
kind: Service
metadata:
  name: example-svc
  labels:
	app: hello-world
spec:
  type: NodePort
  ports:
  - port: 8080
	nodePort: 30001
	protocol: TCP
  selector:
    app: hello-world
It is also important to point out that services are associated with pods through use of tags. If a pod matches the tags associated with the service than it will be included as part of the service.

Finally, one of the best parts of Kubernetes is the Deployments. Deployments in K8S allow for rolling updates, seamless rollbacks, and can stop and rollback a deployment if it is failing. Deployments are capable of managing replica sets, and pods. When working with deployments you will want to utilize replication sets instead of replication controllers, like many things in the container space much of the underlying tools are still a bit of a moving target. Much like everything discussed up to this point, deployments are also created in yml files. Below is an example of a deployment yml file:
apiVersion: extensions/v1beta1
kind: Deployment
metadata:
  name: example-deploy
spec:
  replicas: 10
  minReadySeconds: 10
  strategy:
	type: RollingUpdate
	rollingUpdate:
  	maxUnavailable: 1
  	maxSurge: 1
  template:
	metadata:
  	labels:
    	app: hello-world
	spec:
  	containers:
  	- name: example-pod
    	image: hello-world:latest
    	ports:
        - containerPort: 8080
To build out the deploy.yml you will need to run the following command: kubectl create -f deployment.yml Once your deployment is created you can update the yaml file then run a kubectl apply -f deploy.yml --record The record flag will record your deployment in a history that you can view with the kubectl rollout history deployments example-deploy command.
Kubernetes is an extremely deep topic that would be impossible to adequately cover in a single blog post. The yaml files provided are examples of what a file might look like and are not intended to be run in their current state. To get a better understanding of Kubernetes and all of its moving parts, visit the Documentation section of the Kubernetes site here to dive in deeper.
The state of containers has moved from bleeding edge to production ready over the past few years, and the ecosystem for container management has grown immensely and continues to grow. While not an exhaustive discussion, this post provided an overview of Docker and a few different options for clustering and orchestration. Over the next several years I expect to see an even larger scale adoption of containers and continuing growth in the toolsets used to build and maintain container ecosystems.