Why LinkedIn Ads?
In the dynamic world of B2B marketing, LinkedIn Ads have emerged as an essential element in the daily workflows of marketing departments. This platform serves as a vital acquisition channel, essential for effectively engaging with targeted audiences.
While initiating campaigns on LinkedIn can be straightforward, deriving meaningful insights from the data presents a significant challenge. Despite the platform's capacity to generate vast amounts of data, transforming this data into actionable insights is not always intuitive. This is where the power of Generative AI (GenAI) becomes invaluable.
Amazon Q on Quicksight
In November of 2023, AWS enriched the landscape of Business Intelligence (BI) with the introduction of Amazon Q in QuickSight, blending Generative AI (GenAI) with the analytical power of BI. This advancement represents more than just technological progress; it signifies a new era where data becomes more approachable and insightful through intuitive interactions.
Imagine a scenario where engaging with your data is as straightforward and enriching as a conversation with a colleague. Amazon Q embodies this vision, serving as a BI assistant that simplifies the creation and understanding of insights through natural language. It empowers both analysts and business stakeholders alike, enabling the swift generation of visuals, calculations, and insights without the intermediary of BI specialists.
Beyond its capability to democratize data analysis, Amazon Q is a steadfast protector of your information, rigorously maintaining data access permissions to uphold security and privacy standards. It's crafted to be accessible, inviting users across the spectrum of technical proficiency to uncover valuable insights and craft narratives directly from their data, using simple, natural language.
With the launch of Amazon Q, AWS has not merely introduced a new feature; it has provided a pathway to making data interaction profoundly more human-centric. It's about transforming the intricate into the intelligible, making the vast oceans of data not only navigable but also conversational.
Let's get started
As we dive into this guide on unlocking insights from your data, let's start on common ground. We're assuming you're already set up with a LinkedIn Ads account and have your AWS account ready, with QuickSight up and running.
Setting up Amazon Q on Quicksight
1. Subscribe to Quicksight Enterprise
-
Sign in to your AWS account and open QuickSight from the AWS Management Console. You can find it under Analytics or by searching for QuickSight.
-
Your AWS account number is displayed for verification purposes.
-
Choose Sign up for QuickSight.
-
Choose Enterprise.
2. Enable Quicksight Q in their desired regions
Once you have an active Amazon QuickSight Enterprise subscription, you can take advantage of the powerful QuickSight Q feature to enhance your business intelligence experience. Follow these steps to enable QuickSight Q in your preferred AWS regions:
-
Log in to your AWS Management Console and open the Amazon QuickSight service.
-
On the left sidebar, click on the "Manage QuickSight" section to access QuickSight management features.
-
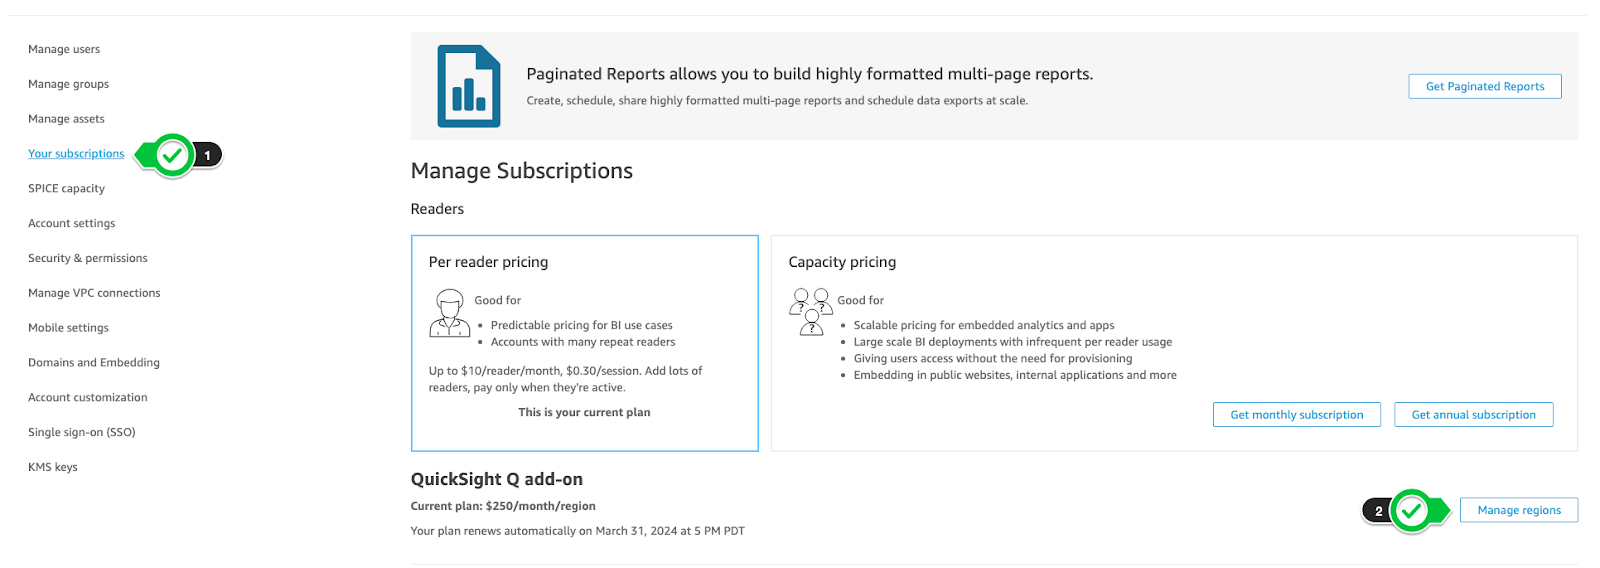
Scroll down to find "Your subscriptions" This section allows you to manage where and how your QuickSight dashboards are shared and embedded.
-
Look to the lower-right corner of the screen for the "Manage regions" option—Click on the "Manage regions" button to proceed. A list of available AWS regions will be displayed.
-
Select the checkboxes next to the AWS regions where you wish to enable QuickSight Q. This action extends the capabilities of QuickSight to the regions relevant to your business, ensuring data locality and compliance.
-
Confirm your selections and follow any additional prompts to finalize the activation of QuickSight Q.
By completing these steps, you'll have successfully enabled QuickSight Q in the regions that best suit your business needs, unlocking the potential to ask business questions in natural language and receive instant answers in the form of visualizations.
3. Enabling Amazon Q on QuickSight: A Step You Don't Want to Miss
Hopefully, this step won’t be needed after Amazon Q leaves preview mode.
Once you've set up QuickSight Q in your preferred regions, the next crucial step is to enable the Amazon Q features within QuickSight itself. Here’s what you need to do:
-
In Quicksight, on the right sidebar, click on the profile icon to open to reveal a dropdown menu.
-
Within the dropdown menu, you’ll see an option labeled “Preview Manager”.

By following these steps, you ensure that the QuickSight Q features are fully operational, allowing you to dive into the world of advanced data analytics and business intelligence. Happy analyzing!
Extract your data from Linkedin
Extracting the right data from your LinkedIn Ads can significantly impact your campaign analysis and subsequent decision-making. Here’s how you can do it effectively.
1. Extract from “Ads” Section:
Start by navigating to the Ads section under LinkedIn Ads. This is typically the best place to extract data that gives you insights into how your ads are performing in terms of clicks, impressions, conversions, and more.
2. Select the data range
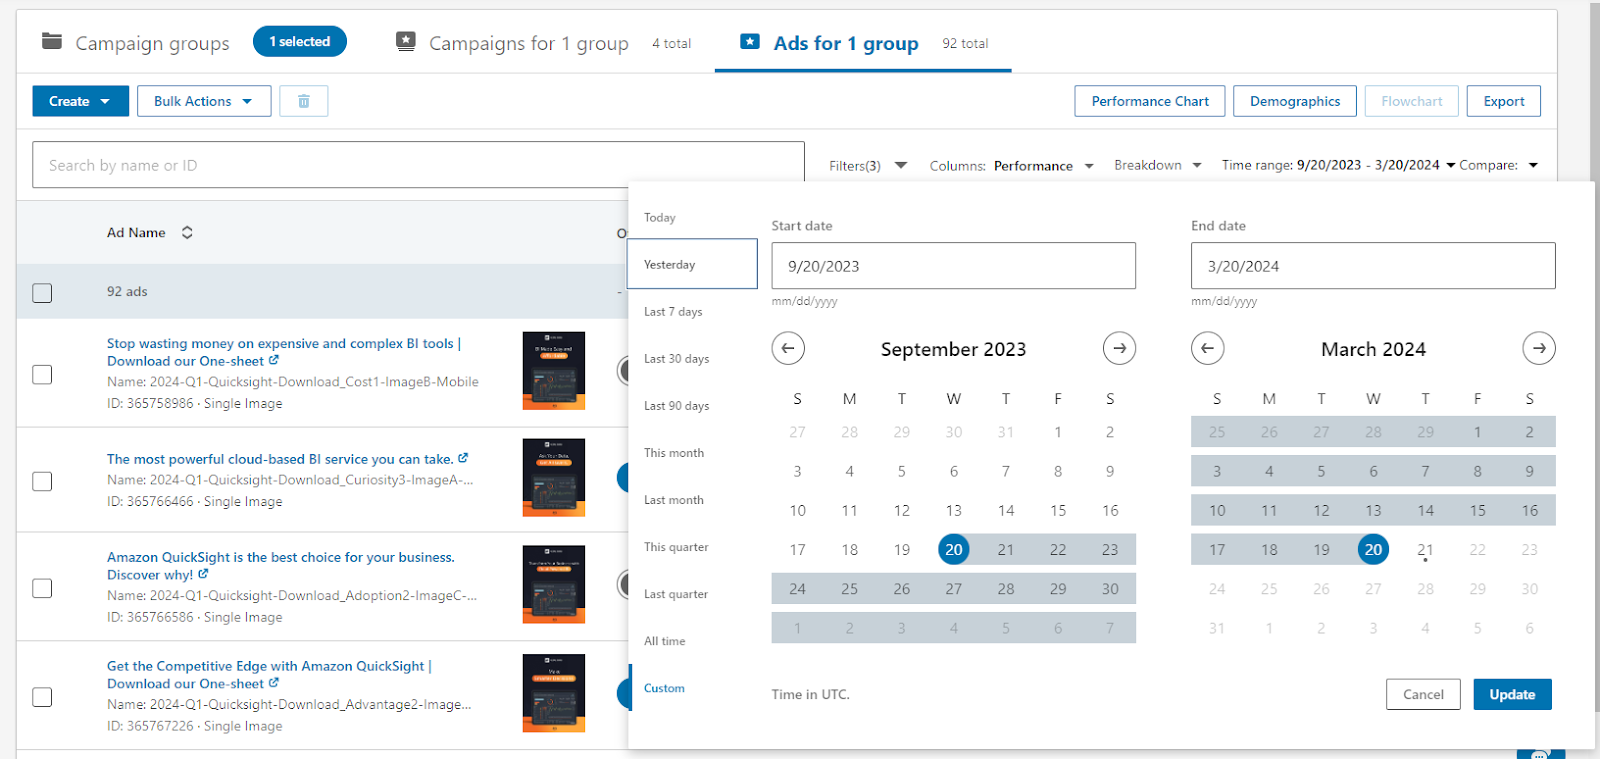
-
Locate the date range selection tool. You will find it on the right-hand side, displayed with a start date and an end date.
-
Click on the calendar icons next to the dates to bring up a date picker. LinkedIn allows you to choose from predefined ranges such as 'Today', 'Yesterday', 'Last 7 days', 'Last 30 days', etc., or you can select a custom range that suits your needs.
-
Be aware that there is a limitation: you can only extract daily data for up to six months in the past. To set a custom range, click on 'Custom' and select the start and end dates from the calendars provided.
-
After setting your desired range, click the "Update" button to apply the new date filters to your data.
-
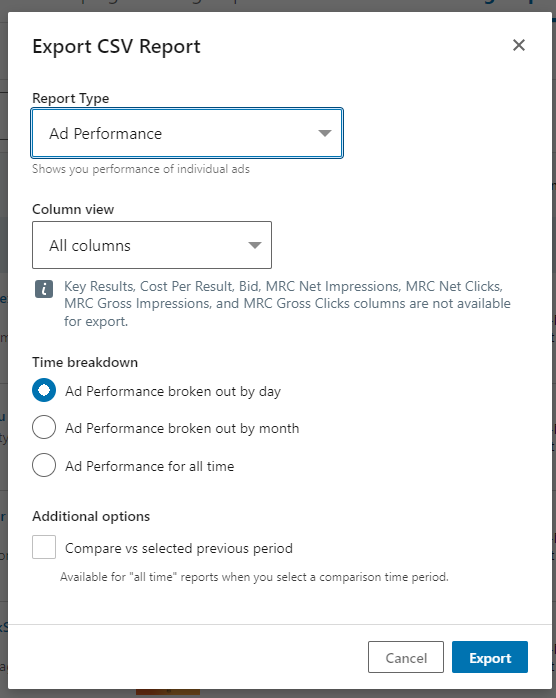
Once you have your date range set, click on the "Export" button, found in the upper corner of the report section. For analytical purposes, the "Ad Performance" report type is recommended as it provides a comprehensive overview of your campaign's key metrics. After confirming your choices, initiate the export, and LinkedIn will prepare and download a CSV file
Important Note on Handling the Exported CSV
LinkedIn includes informational metadata at the top of the CSV file, typically covering the first five rows, which detail the data range and other information regarding the export. These are not part of the actual data set and should be removed for a clean data analysis process.
Open the CSV file in your preferred spreadsheet program and manually delete the first five rows to eliminate these headers. This will leave you with just the raw data, starting from the sixth row onwards, ready for analysis or import into Quicksight. For a full-fledged solution, you would want to automate this process in your ETL Pipeline.
Uploading Your LinkedIn Data Set into Quicksight
After you have extracted and prepared your LinkedIn data, the next step is to upload it into Amazon Quicksight to begin the deeper analysis.
-
Navigate to the “Datasets” on the left navigation bar of Quicksight.
-
Click on “Datasets,” then select “New dataset.”
-
Choose the upload option for a CSV file and select the file from your computer.
a. Alternatively, if you are familiar with AWS, you can load your dataset in different ways, for instance, using a S3 bucket.
-
Follow the prompts to upload the file, ensuring fields are correctly identified.
-
Finalize by clicking the “Visualize” button to create and see your dataset.

Creating a Topic with Amazon Q in QuickSight Analysis
After uploading your LinkedIn dataset into QuickSight, the visualization process begins:
Once you click the “Visualize” button, QuickSight will transition you to the Analysis UI. Here, you are greeted with a canvas that's ready for you to craft your visual representations.
Before delving into traditional visualizations, you have the opportunity to leverage the power of generative AI with Amazon Q. This feature allows you to interact with your data using natural language, getting insights as if you were querying an expert.
-
Within the QuickSight Analysis interface, observe the top bar to find the “Build Visual” option. It’s designed to craft both your standard data visualizations and to facilitate the creation of a new, interactive topic with Amazon Q.
-
Click on “Build Visual” to open the interface for topic creation. Give it a name that succinctly captures the essence of the queries you plan to run. For instance, if you are analyzing marketing data, you might name your topic "Marketing Campaign Insights."
-
As QuickSight Q prepares your topic, think about the queries you plan to submit. Your topic should be formulated to address a wide array of questions while being specific enough to yield precise and actionable insights.
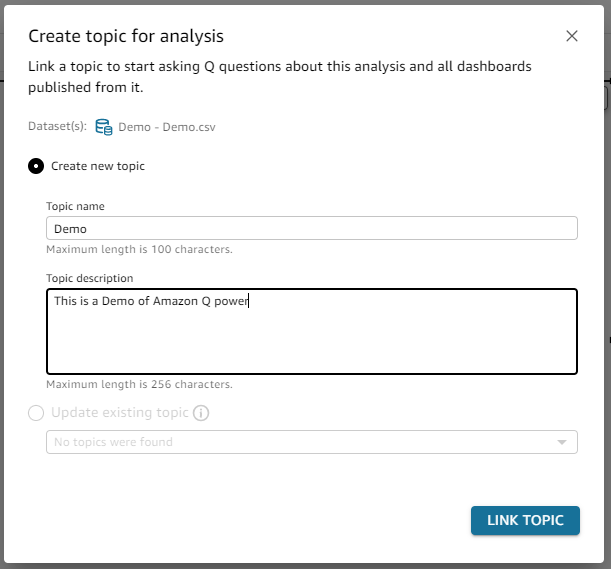
-
The final step is patience. The system may take some time to analyze your data and prepare your topic fully. Once it's ready, you can begin asking questions in natural language, and QuickSight Q will interpret your queries and present you with visual answers based on your data.
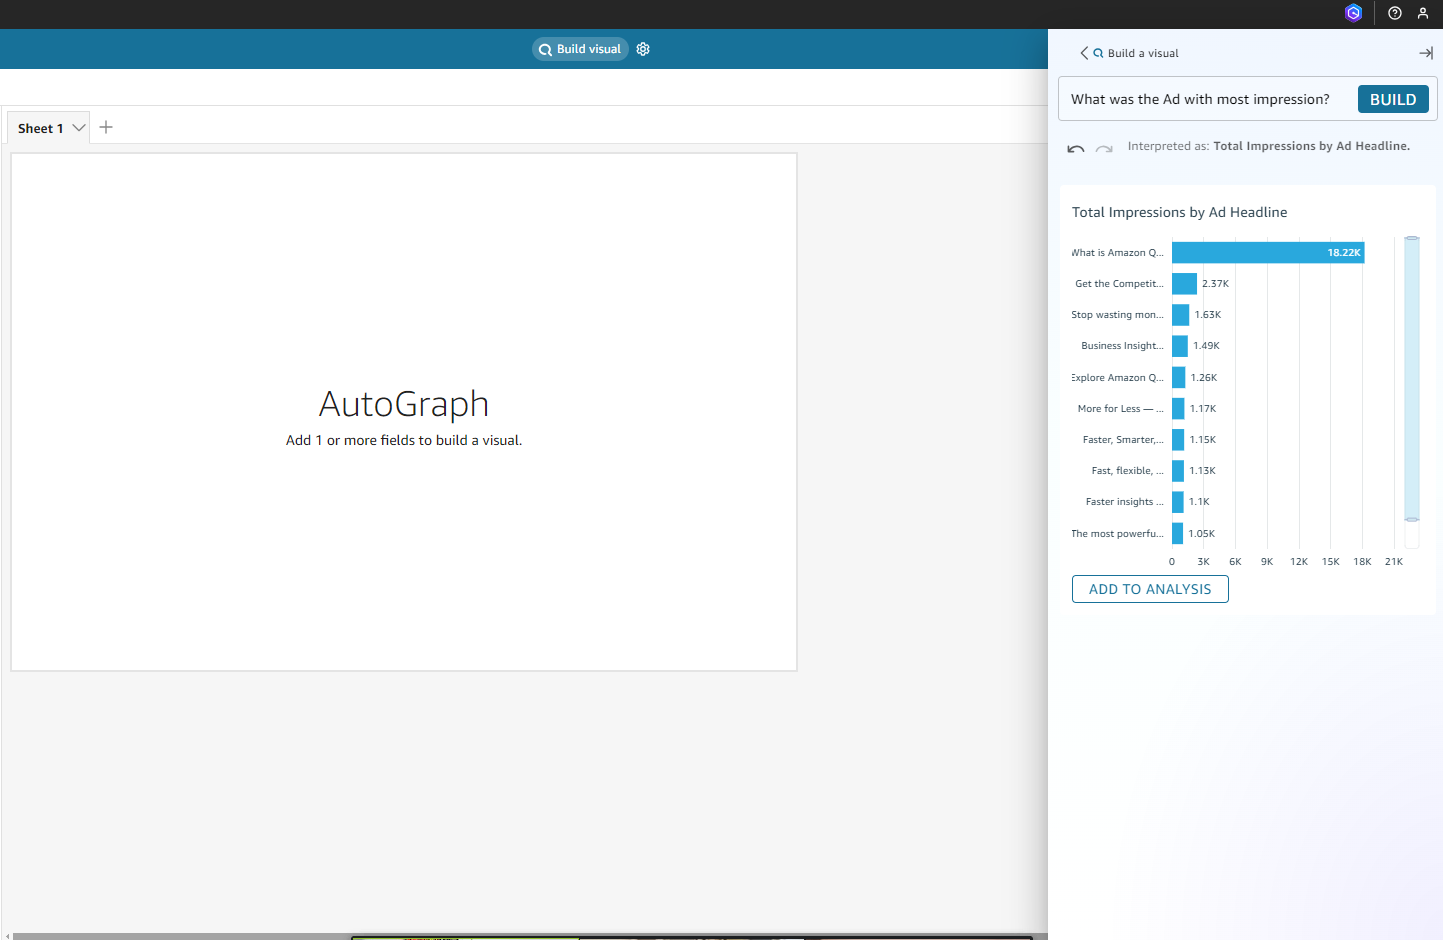
Now, with the topic linked, you can immediately start interacting with your data. You can click on “Build Visual” and a right bar will open. On this, you'll notice a space where you can type in your questions. This conversational feature allows you to ask about your data in natural language, like "What was the ad with more impressions?"
While you can begin querying right away, it's best practice to spend time ensuring that the data hygiene is satisfactory. and that the data answers the anticipated kinds of questions that people will ask. This preliminary step can significantly enhance the quality of the insights you'll receive.
Review your data within the topic
While you can begin querying right away, it's worthwhile to take a moment for a brief review of your data. A cursory check can help ensure that it's formatted correctly and that you've anticipated the kinds of questions that your topic will need to handle. This preliminary step can significantly enhance the quality of the insights you'll receive.
To improve your dataset within the topic:
-
Begin by returning to the QuickSight home screen.
-
On the left sidebar. Click on “Topics” to view the list of all topics you’ve created or have access to.
-
Browse through the list and identify the topic you want to improve. Once you find it, double-click on your topic. This action will open the topic's detailed view.
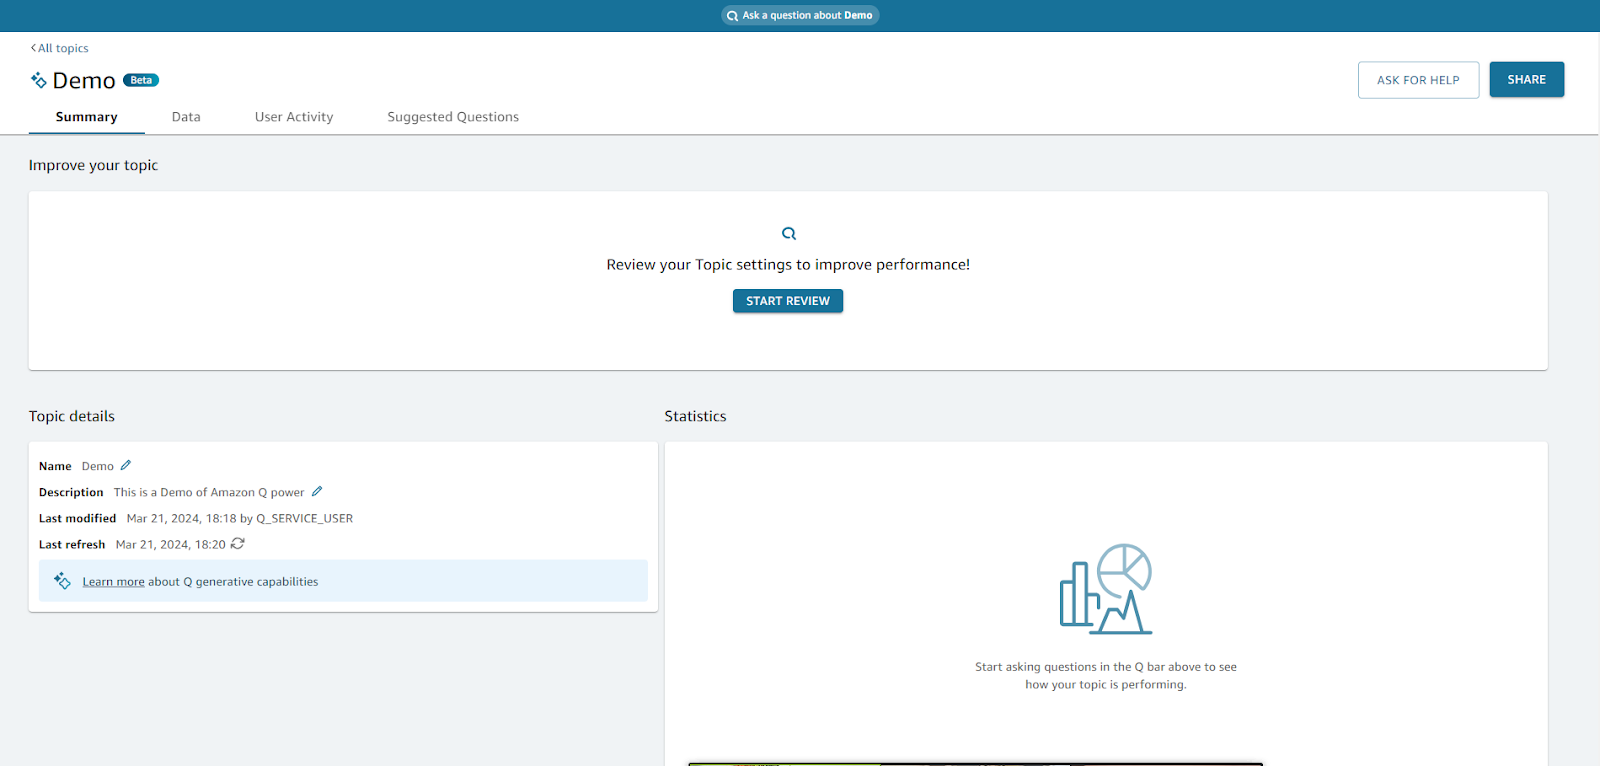
After accessing your topic's detailed view:
-
In the detailed view of your topic, you will see several tabs such as "Summary," "Data," "User Activity," and "Suggested Questions." To view and enhance your dataset, you will need to navigate to the "Data" tab;
-
Click on the "Data" tab to reveal the structure of your dataset. Here, you can examine the data fields that are being used by Amazon Q to generate insights.
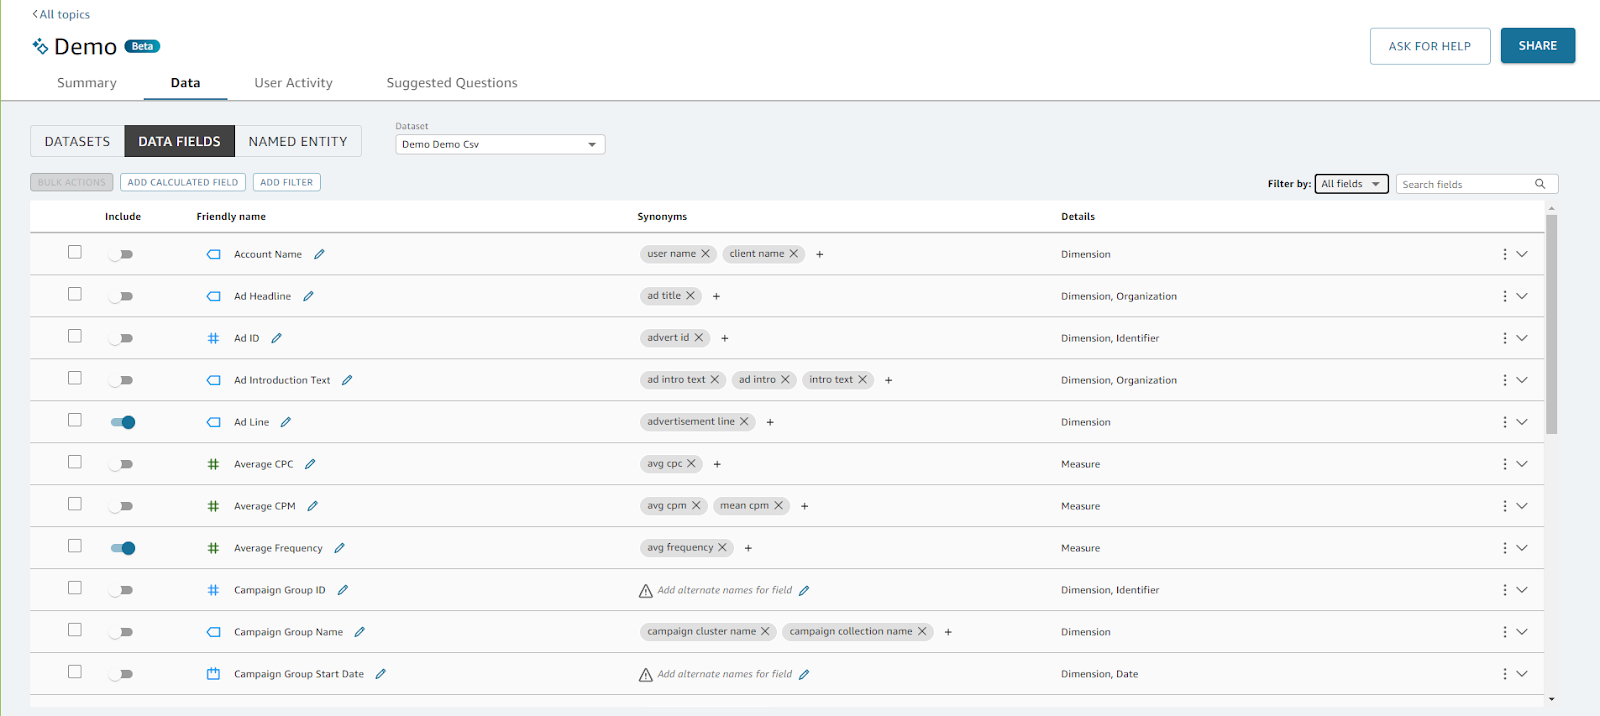
Exploring Data Fields:
-
In the Data Fields tab, you’ll see a list of all fields available in your dataset.
-
Each field has an "Include" toggle, allowing you to choose which data is factored into Amazon Q's analysis.
-
Friendly names can be given to fields for ease of understanding, and synonyms can be added to improve recognition by Amazon Q.
Adding Synonyms:
-
Synonyms ensure that when you ask questions using different terminology, Amazon Q understands what you’re referring to.
-
To add a synonym, click on the synonym field next to the data field you want to define. For example, you might add "cost per click" as a synonym for "Average CPC.
Adjusting Field Settings:
-
Click on a specific field to expand its settings. Here you can provide a description, specify the field’s role (such as dimension or measure), and set semantic types.
Adjust the field settings to ensure that Amazon Q interprets the data correctly, improving the quality of insights generated.
-
For more information about these options, check the AWS documentation.
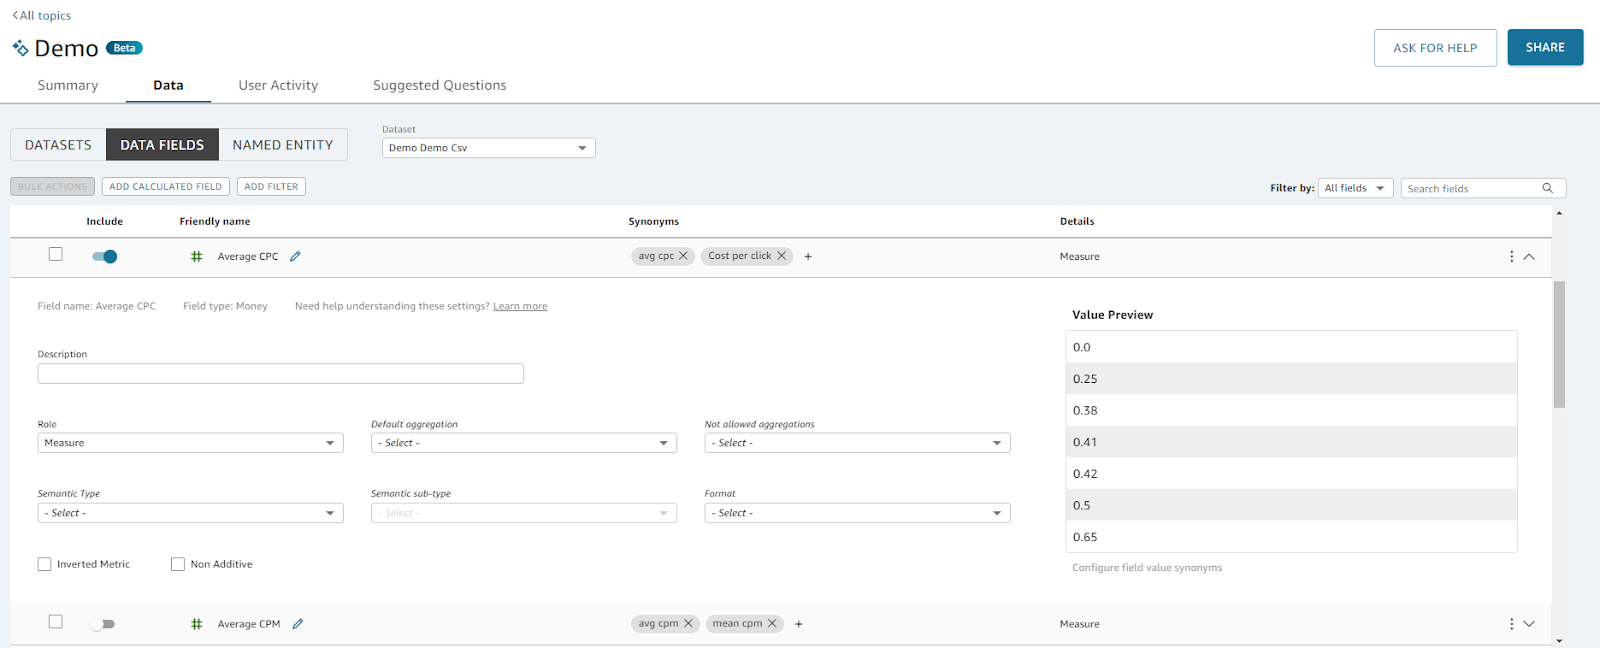
Adding Calculated Fields and Filters:
-
You may need to create calculated fields or apply filters for more advanced analysis. Use the "Add Calculated Field" or "Add Filter" options to customize your dataset further.
-
These features allow you to craft specific metrics that Amazon Q can analyze, providing tailored insights based on your unique data needs.
By thoughtfully adjusting these settings, you ensure that your dataset is not only accurate but also aligned with the kinds of queries you will be asking. This preparation is key to leveraging the full potential of Amazon Q in QuickSight for data-driven decision-making.
Start making questions
With your dataset in place and your topic configured, you can now interact directly with your data using the power of Amazon Q's conversational queries, you can use it directly from the Topic screen or you can head to the Analysis dashboard where your topic is active.
-
In the sidebar or at the top of the screen, you should see a query bar or a button labeled “Ask a question.” This is where you can type in natural language questions about your data.
-
Try entering a query like “Which ad is performing the best?” Amazon Q will interpret your question and present you with a visualization, such as a bar chart showing total impressions or conversions by ad headline.
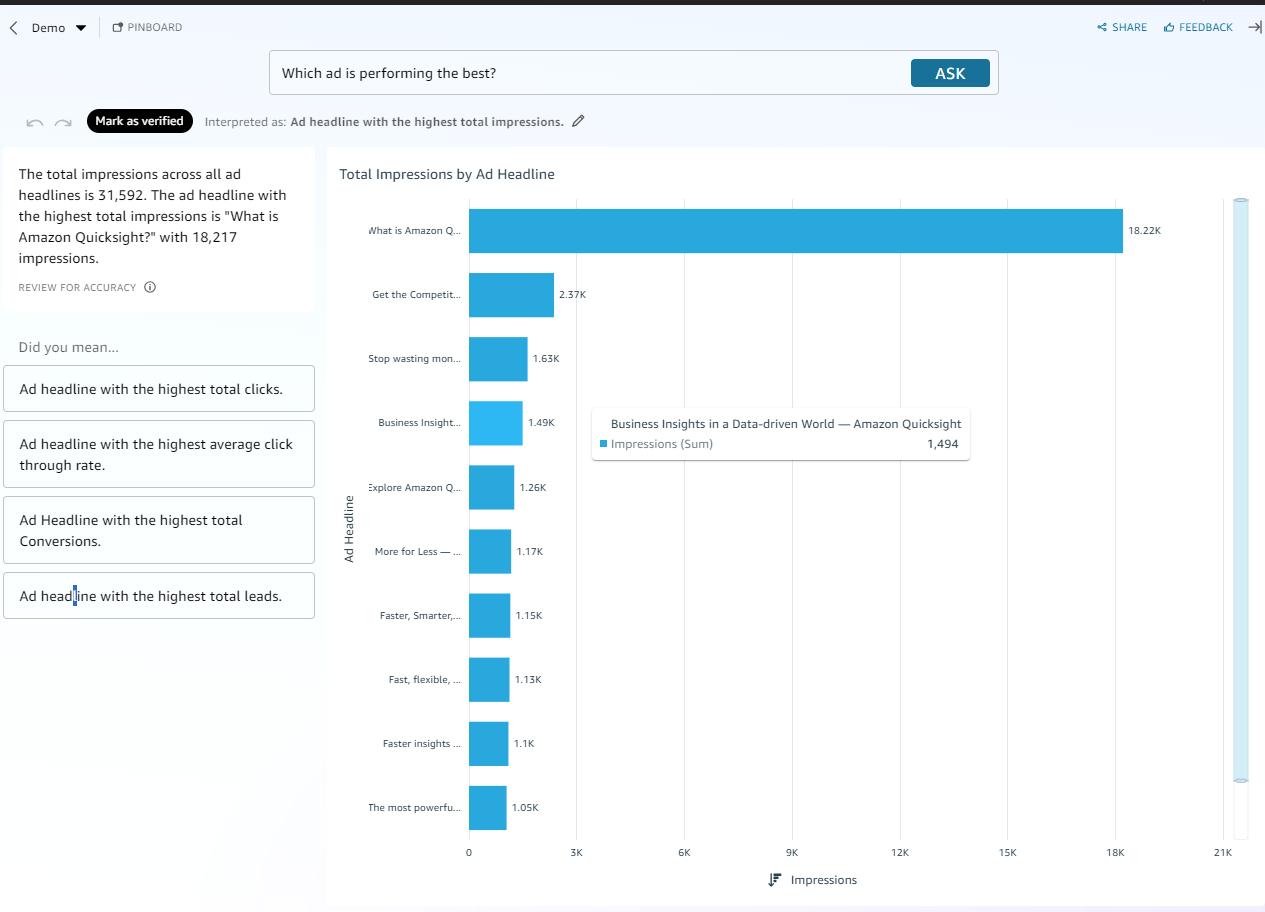
-
Amazon Q provides you with more than just a single answer – it offers alternatives to consider. For example, you might see variations like “Ad headline with the highest total clicks” or “Ad headline with the highest average click-through rate.”

-
Review the visualizations provided for each interpretation of your question. QuickSight not only displays the data but also suggests possible follow-up questions to further your exploration.

-
To refine your queries and get more precise answers, use the feedback option. If an answer isn't quite what you were looking for, provide feedback directly in the interface to help Amazon Q learn and improve its responses to you.
Start asking your data all the pressing questions you have. With each question, Amazon Q will utilize its generative AI capabilities to provide you with insights, helping to uncover trends and performance metrics that can inform your business strategies.
Leveraging and Sharing Insights with QuickSight
Gaining insights from your data is just the beginning. QuickSight's powerful sharing capabilities ensure that your findings make an impact where it counts. Here’s how you can share and utilize your insights:
Sharing Through Pinboard
Pinboards in QuickSight serve as a curated space for your most valuable visuals within Amazon Q.
-
Once you have a visualization that encapsulates a key insight, look for the “pinboard” option
-
Pin your visual to a pinboard for easy access later. Think of this as bookmarking the insights you don’t want to lose sight of.
-
Pinboards can be shared with your team, giving them instant access to important metrics and findings. This fosters collaboration and ensures everyone is on the same data-driven page.
Publishing a Dashboard
For a more comprehensive sharing approach, publish your entire analysis as a dashboard:
-
After completing your analysis in QuickSight, find the “Share” or “Publish” option—this will allow you to create a dashboard from your current analysis.
-
When you publish a dashboard, you’re creating a shareable entity that can be accessed by others in your organization.
-
Dashboards maintain the interactivity of your analysis. Recipients can drill down into the data, apply filters, and gain insights just as you can.
-
Remember to set the appropriate permissions to control who can view or interact with the dashboard.
By utilizing pinboards for quick sharing and dashboards for comprehensive overviews, QuickSight turns your analyses into actionable, shareable, and collaborative tools. Harness these features to make your insights go further and work smarter for your team.
How this blog post was made?
This blog post is a culmination of insights and experiences gleaned from the 2024 Metal Toad Hackathon, specifically the "Tutorial on AWS" challenge. It's a testament to the collaborative spirit and technical prowess of our team, consisting of dedicated professionals who brought this vision to life:
- Adriana Ukei
- Gabriel Fruet
- Helder Nascimento
- Nathan Wilkerson
- Vinícius Fruet
Their collective knowledge and experience have been instrumental in crafting the content of this post, showcasing the practical applications and innovations possible with AWS technologies.
For further inspiration and to explore a variety of innovative solutions developed during the hackathon, we encourage you to explore the results from other groups through the links below. Each link unveils unique approaches and creative uses of AWS, reflecting the depth of talent and ingenuity within the Metal Toad community.
We hope this post and the linked projects inspire you to push the boundaries of what's possible with AWS and technology as a whole. Remember, at Metal Toad, we're more than just a team; we're a community driven by curiosity, respect, and the relentless pursuit of excellence.